HRV response to perceived training load – Observations from 2.5 months of data

About two months ago the new version of iThlete was released with some really cool new features. These new features included;

  • The ability to rate your sleep on a score of 1-5
  • A comment section that allows you to make notes about the previous day’s events, stressors, etc.
  • The ability to input training loads that appear on your HRV trend chart so you can see how your HRV responds to your training
  • The ability to export data to drop box

Here is a video that shows the updated features;

The most significant addition in my opinion is the ability to track your training loads with your HRV trend. This really puts into perspective how stressful your workouts are. There is no specific method or formula that you have to use for your training load data. There are several methods that have been used in research to quantify training load, some of which I’ll describe below.

Training Impulse (TRIMP) – this is calculated using training duration, maximal heart rate, resting heart rate and average heart rate during the session

Session Rating of Perceived Exertion (RPE) for Endurance Athletes – Session RPE score x duration of exercise in minutes (for endurance training)

Session Rating of Perceived Exertion (RPE) for Strength/Power Athletes – Session RPE score x repetitions

*See Borrensen & Lambert (2009) for a more elaborate review and explanation of the above methods.

       Training Volume – Weight Used x Sets x Reps

Other methods exist, but these tend to be the most commonly used. In deciding how I would monitor my training I simply decided to use an RPE of the session, however, not like the method listed above. Instead, I simply rated my workout on a scale of 1-10 based on how hard, or how much effort I put into the session. I would consider volume, strain, RPE of my main sets, how hard I pushed my assistance work and so forth. I realize this isn’t the most valid or reliable measure of training load, but it’s been working well for me.

To give you an idea of how I grade my workouts, see below. This will make interpreting the charts I attach below of my trends much easier.

Session RPE of 10 – 3 or more top sets for my main exercise, RPE of 9-10 for each set, high volume of assistance work (3+ sets to failure), complete exhaustion by workouts end. I have yet to perform a 10 workout and likely never will.

Session RPE of 9 – 2-3 top sets for my main exercise, RPE of 8-10 for each set, moderate volume of assistance work (2-3 sets not to failure), considerable fatigue at end but not exhaustion.

  • I’ll typically perform these workouts when HRV is above baseline

Session RPE of 8 – 1-2 top sets for my main exercise, RPE of 8-9 for each set, low to moderate volume of assistance work (1-3 sets not to failure), moderate fatigue at end

  • I’ll typically perform these workouts when HRV is at the lower end of baseline

Session RPE of 7 – 1 top set for main exercise with an RPE of 8 or less, low volume of assistance work with reduced weight, minimal fatigue at end.

  • I’ll perform this workout when HRV is below baseline with an amber indication (deload)

Session RPE of 5 – No main exercise performed, light weight, moderate volume

  • This is what I’ve been doing on Sunday’s to hit delts and arm’s since I don’t do much work for them during my main sessions on Mon-Wed-Fri

Session RPE of 3 – Active recovery work for 20-40 minutes. This can be in the form of light jogging, sled dragging, circuits, etc.

  • I try and perform these workouts the day after each workout to facilitate recovery and maintain an aerobic base level of conditioning

Session RPE of 1 – Leisurely walk for 30-40 minutes. This can hardly be described as a workout but it’s more than a zero so I will log it when it happens.

  • This happens sometimes instead of an active recovery session.. usually when I’m visiting my folks as we’ll take a lot of walks.

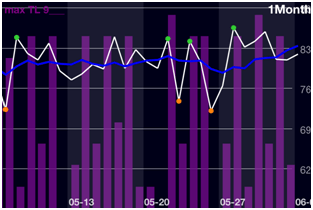
So as you can see there is no sexy formula (I’ve never been a math guy anyway), but I’m pretty consistent and I’ve noticed some fairly common trends in my recovery (based on HRV). Below I have attached a couple screen shots of my HRV Trends with Training Load (Session RPE ala Andrew Flatt). The purple bars reflect training load (9 being the highest you’ll see) while the horizontal trend is my HRV daily fluctuations with the blue line representing my baseline.
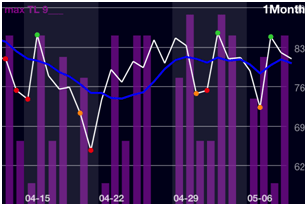
Observations:

  • See here and here for previous posts about observations I’ve made from monitoring my HRV
  • A session rated as 9 is almost always going to cause a pronounced drop in HRV the following day. This is why I don’t typically train on consecutive days.
  • If circumstance causes me to train two days in a row, I’ll use a Session RPE of 8. My HRV will usually drop moderately after the first workout out and drop even more after the second one.
  • During the passed 2.5 months I experienced approximately 16 instances where my HRV dropped enough causing an amber or red indication. The majority of these occurred the day after a session and therefore fell on a recovery day.
  • There were 5 days in which a red or amber indication fell on a training day and therefore out of the 2.5 months, I only deloaded for a total of 5 days. In the past I would typically take a week off after every 3 week cycle however with my new system of training I simply deload on a given day when my HRV is well below baseline.
  • The lowest dip on the graph (around 04/20) I purposefully trained harder than normal on a below baseline day (amber indication) to see how my body would react. The next day my HRV dropped even lower with a red indication. This, as well as other incidences from the past solidifies my stance that training hard when HRV is low delays recovery. You’ll see that it takes several days until my HRV gets back up to previous levels. This negatively effects future training sessions. In my opinion, it’s much better to reduce loads for one day to improve the effect of your following sessions as opposed to just training through a bad day and ruining the next few sessions. This is also what has inspired me to stop deloading at pre-determined times for pre-determined periods. There certainly is value in doing this as the body needs time to recover and adapt to weeks of hard training. However, with HRV monitoring, it seems (atleast to me, for right now) that you can get away with just reducing loads on days when HRV is low.
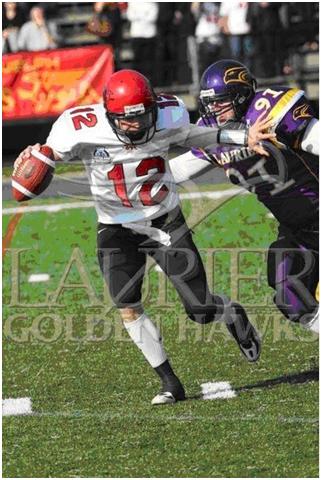
  • I’m presently the leanest I’ve ever been at my current body weight. I’m about 232lbs at 17%. The leanest I’ve ever been is 14.8% at 218 while the heaviest I’ve ever been was nearly 270lbs when I played collegiate football (I’m the ogre in purple below from back in 2006).

  • I’m presently the strongest I’ve ever been at this body weight.
  • I’ve been able to remain injury and illness free since using HRV to guide my training. I no longer experience any tendonitis in my elbows either which used to be a big problem.

Final Thoughts:

I realize that I may appear overly biased towards HRV’s usefulness in my writing. However, I feel that I’ve been training long enough to know when something’s all in my head (placebo) or when it’s actually making a difference. The science supports HRV (see here) and my experience up to and including the present also seems to support it. The whole concept of planning training in advance and sticking to it no matter what is not as effective as manipulating training on a day to day basis according to an objective measure of your body’s current adaptive capacity. This doesn’t mean you can’t have a general plan, it just means that you need to be prepared to make adjustments along the way to ensure the quickest and safest way to reach your training goal. HRV provides, in my opinion, the simplest and most accurate information to allow you to do this. I will continue with this method of monitoring and training since it has been so successful. I’ll be sure to provide another update in a few months.

Thanks for reading.

Managing Training for Strength

In my last post I discussed some of the shortcomings of pre-planned training. This inspired a conversation between myself and a friend about percentage based training. Today I’d like to talk about some thoughts I have on this topic. Additionally, I will offer some potentially better strategies to help manage and adapt your training on a day to day basis.

To be clear, percentage based training (in the context of this discussion) refers to planning training loads based on a percentage of your 1 rep max in a given lift.

For example, if your 1 rep max in the Bench Press is 300, you know that 50% of this is 150. Strength is generally believed to best be built by working over 85% of your 1 rep max. From our example, 300x.85=255 and therefore 255 is 85% of our 1 rep max of 300. The purpose of using percentages is to control the level of intensity, effort and fatigue placed on the body to create a desired effect. Generally, you can perform only 1 rep with 100%, 2 reps with 95%, 3 reps with 90% and so on.

% 1RM

100

95

90

85

Reps

1

2

3

5

I think that percentage based training is most effective for novice to intermediate level lifters. This is because they are nowhere near their strength potential. Progressing from workout to workout is much more feasible for them. They can adapt better and faster to the loads because the loads simply aren’t that great yet.

Now for a more advanced trainee, percentage based programs can be less beneficial for several reasons.

  • Percentages are based off a 1rm (or a calculation of a 2-5rm) that were taken on a given day. Your strength levels can and will vary day to day based on recovery status, stress levels, nutrition and several other factors. Therefore a percentage based off the 1rm recorded on a previous day will unlikely be a true reflection of present strength levels.
    90% of your 1rm can easily be 100% on an off day. We’ve all had workouts where the weights felt heavy. We’ve also had days where the weights felt light. If you grinded out 85% for 3 hard, sloppy reps, was it really 85%? In reality it was more like 90%. This can create problems in the program because 85% x3 should generally be a very manageable lift and therefore not tax the body too much. However, since the weight was actually much heavier than 85% on that given day, we’ve created more stress and fatigue then was called for. This is how we set ourselves up for missing lifts in subsequent workouts and nothing is more frustrating than missing lifts.
  • Pre-planned percentage based training is basically telling your body that it must adapt to the training rather than allowing your training to adapt to you. Unfortunately, we do not have conscious control over how we adapt or when. Therefore, it would be much wiser to plan according to the current strength and adaptability levels of our body. We can’t force our body to get stronger.. often times when we try and do this our body tells us to suck it and we regress, or worse, we get hurt. I’ve been down that road.

How do we adapt our training to our body?

1.

I’ve become a big advocate of using RPE (ratings of perceived exertion) to manage training loads. I first learned about RPE when studying for the CSCS exam several years ago. However, it wasn’t until I read Mike Tuchscherer’s Reactive Training Systems Manual that I really started to incorporate them into my training. Essentially, with an RPE system we plan to work up to a given RPE for a given amount of reps and sets as opposed to using a percentage of a 1rm. This allows us to “pre-plan” our training in accordance with our most current strength level. The following chart shows how a RPE score corresponds to effort level.

RPE

Reps left in the tank

10

0

9

1

8

2

10 is an all out effort. It can be a 1 rep max, a 5 rep max or any number really. As long as it was an all out effort where you are unable to perform another rep. An RPE of 9 means you had 1 rep left in the tank. There is a huge difference between an RPE of 9 and 10 due to its effect on the CNS. It takes much longer to recover from a 10 than a 9. This is what makes RPE’s more accurate than percentages.

This system eliminates missed reps at a given percentage because the selected weight is now much more accurate and fits your present strength levels for that day. For more info on RPE’s check out Mike’s book and free articles on his site.

2.

Pay attention to indicators. Things such as sleep, stress, nutrition and restoration work can all have a pretty drastic effect on your strength levels and adaptability. The following is a list of different indicators you can start to monitor if you don’t already.

  • Sleep: I rate my sleep on a scale of 1-5.
    5 = 7-8 hours of sleep, no wakes or disturbances, morning wood, etc
    4= 1 disturbance or wake up during the night
    3= less than 7 hours of sleep, and/or multiple wake ups
    2=Usually if I’m sick and can’t fall asleep
    1=no sleep
    Supplementing with ZMA really helps improve the quality of my sleep.
  • Stress: Primarily for this I use HRV measurements. I’m not going to elaborate on this since I’ve written about it extensively in previous posts. If you’re unfamiliar with HRV then I highly recommend you click here and start with “HRV Explained Part 1″.

    If HRV isn’t an option for you there are other way’s to monitor your stress. I have to thank Simon Wegerif (creator of iThlete) for introducing me to this method in a conversation we had over Skype. Stress can be classified as; physical, mental or chemical.

    Physical Stress = training, labour, etc.

    Mental Stress = financial problems, fighting with a significant other or parent, travel, death in the family, etc.

    Chemical Stress = Alcohol intake, poor or inadequate nutrition, etc.

    You may not perceive things like poor nutrition or mental stressors as significant stress, but I assure you, they play a big role in how strong you’ll be on a given day and how much further training stress you can handle.

    Rate each one of these on a scale of 1-5. You’d be surprised what you discover by monitoring stress and how it relates to and effects your strength levels

    I love the HRV app because it plots your stress levels on a chart so you can see trends over time. Looking back over the trends with your training log and indicators tell you a lot about what’s working and what’s not.

  • Restoration Work: Foam rolling, stretching and moderate aerobic work can have a huge impact on your recovery and fitness levels. I will reserve writing about the benefits of aerobic work for strength athletes now since I plan to write an entire post on it in the future, but understand that a little cardio (in the form of jogging, sled dragging, etc) goes a long way in contributing (indirectly) to strength gains. I simply keep a log of what type of aerobic work I do, for how long and if I use a sled I track the weight.
  • CNS Test: Finally, I like to perform a quick CNS test after my warm-ups but before I start lifting. This can be in the form of a vertical jump, broad jump, grip test or whatever else you can think of. It’s important to be consistent. Compare your daily result to your baseline or average and that will usually indicate how your workout will go. I’ve actually found that skipping (yes, jumping rope) is a good indicator for me. Some days I can skip like a 3rd grade school girl with flawless technique. Other days I can’t get into a rhythm and stomp the rope every ten jumps. I’ve found that this has a correlation to my strength performance that day.

The longer you train and more advanced you get, the harder it is to make progress. If you haven’t adopted any of the above strategies to help monitor your training I encourage you to consider some. You have nothing to lose and only strength to gain.

Thanks for reading.